Channel简介
Channel是Netty网络操作的抽象类,聚合了一组功能包括但不限于网络的读写,客户端发起连接,主动关闭连接等.也包括了Netty框架相关的功能,比如获得该Channel的EventLoop和pipeline等.
在Netty中Channel是和JDK的SocketChannel分开的. 通过自定义的Channel对网络的I/O操作,网络I/O相关联的其他操作封装起来.统一对外提供.并且为SocketChannel和ServerSocketChannel提供了统一的视图.由不同的子类实现不同的功能.公共功能在抽象父类实现.最大的实现了功能和接口的重用.
Channel抽象类方法
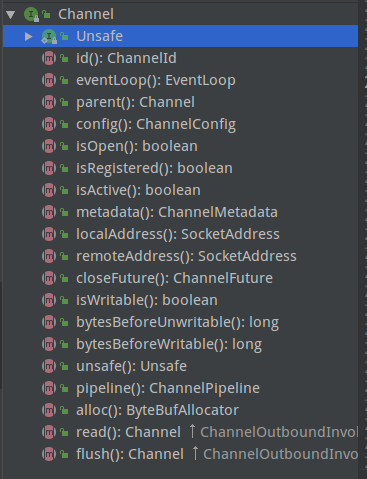
这里就是Channel的内部的方法.里面包含一个抽象接口unsafe,是Channel的辅助接口.实际上具体的网络读写操作都是unsafe来完成的.Channel使用来给用户提供的一个调用接口.接下来来分析一些它的实现类来看看是怎么实现的.
源码分析
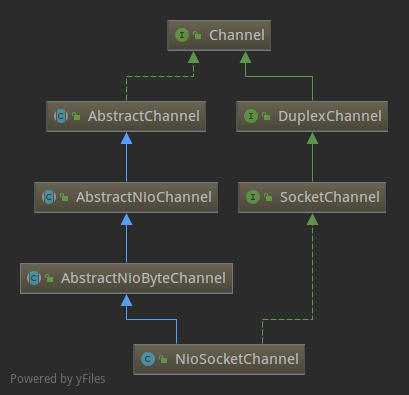
在Netty中,Channel的实现类特别多,但是最终我们用到的应该是NioServerSocketChannel和NIOSocketChannel.这里就着重介绍这两个核心类.先来看一下这两个核心类的继承类图
NioServerSocketChannel

NioSocketChannel
分析源码就从上向下分析吧,先从Abstractchannel类开始.这是一个抽象类.
AbstractChannel源码分析
字段
1 | public abstract class AbstractChannel extends DefaultAttributeMap implements Channel { |
在这里,AbstractChannel聚合了所有Channel使用到的能力对象.由AbstractChannel统一进行初始化和封装.如果功能和子类相关.则由子类去实现.这里不得不说一句,Netty的设计极大的利用了继承体系.代码复用规则利用的是淋漓尽致.接下来看具体实现.
核心API分析
初始化1
2
3
4
5
6
7
8
9
10
11
12
13
14
15
16
17
18
19
20
21
22
23
24
25
26
27
28
29
30
31
32
33
34
35 protected AbstractChannel(Channel parent) {
this.parent = parent;
id = newId();
unsafe = newUnsafe();
pipeline = newChannelPipeline();
}
protected abstract AbstractUnsafe newUnsafe();
protected DefaultChannelPipeline newChannelPipeline() {
return new DefaultChannelPipeline(this);
}
~~~
就是新建一个新建一个pipeline,unsafe实例和id属性.unsafe与子类相关,所以这里是newUnsafe()抽象方法,由子类实现.pipeline都用的是默认的pipeline,在这里实现.
**网络I/O操作**
~~~java
public ChannelFuture connect(SocketAddress remoteAddress, SocketAddress localAddress) {
return pipeline.connect(remoteAddress, localAddress);
}
public ChannelFuture disconnect() {
return pipeline.disconnect();
}
public ChannelFuture close() {
return pipeline.close();
}
public ChannelFuture deregister() {
return pipeline.deregister();
}
这里可以看到网络I/O操作就是调用pipeline的网络操作进行.也就是调用其中的handler进行具体逻辑.
公共API
对于一些公共的API,例如remoteAddress()和localAddress()方法等,此类中提供了一些实现.1
2
3
4
5
6
7
8
9
10
11
12
13
14
15
public SocketAddress remoteAddress() {
SocketAddress remoteAddress = this.remoteAddress;
if (remoteAddress == null) {
try {
this.remoteAddress = remoteAddress = unsafe().remoteAddress();
} catch (Error e) {
throw e;
} catch (Throwable t) {
// Sometimes fails on a closed socket in Windows.
return null;
}
}
return remoteAddress;
}
首先从自己变量中获取,如果没有,在调用通过unsafe来获取.此unsafe()是需要子类去自己实现的.
AbstractNioChannel源码分析
字段
1 | public abstract class AbstractNioChannel extends AbstractChannel { |
API
初始化1
2
3
4
5
6
7
8
9
10
11
12
13
14
15
16
17
18
19protected AbstractNioChannel(Channel parent, SelectableChannel ch, int readInterestOp) {
super(parent);
this.ch = ch;
this.readInterestOp = readInterestOp;
try {
ch.configureBlocking(false);
} catch (IOException e) {
try {
ch.close();
} catch (IOException e2) {
if (logger.isWarnEnabled()) {
logger.warn(
"Failed to close a partially initialized socket.", e2);
}
}
throw new ChannelException("Failed to enter non-blocking mode.", e);
}
}
初始化就是根据传进来的参数设置Channel,此Channel是JDK内置的Channel.然后设置感兴趣事件,接着设置为非阻塞模式.如果中间发生异常,则抛出.
doRegister
首先来看一下doRegister()方法.也就是Channel的注册方法1
2
3
4
5
6
7
8
9
10
11
12
13
14
15
16
17
protected void doRegister() throws Exception {
boolean selected = false;
for (;;) {
try {
selectionKey = javaChannel().register(eventLoop().unwrappedSelector(), 0, this);
return;
} catch (CancelledKeyException e) {
if (!selected) {
eventLoop().selectNow();
selected = true;
} else {
throw e;
}
}
}
}
先定义一个变量来表示是否成功.调用此SelectableChannel的register方法,将当前的Channel注册到EventLoop的多路复用器上.这里的SelectableChannel就相当于是JDK中的实现了此类的任意一个Channel.这里的register方法由具体的Channel实现.也就是JDK中的Channel的register方法.
这里注册感兴趣的事件为0,也就是对任何事件都不感兴趣,仅仅完成注册操作,之后接受到网络事件通知的时候可以在设置SelectionKey的感兴趣事件.如果此Channel已经取消,则抛出异常.如果是第一次处理该异常,则立即调用selectNow()方法将已经取消掉的selectionKey从多路复用器中删掉.继续发起下一次操作.如果仍然有异常,说明无法删除已经被取消的selectionKey,JDK中出现的BUG,直接抛出异常.
doBeginRead1
2
3
4
5
6
7
8
9
10
11
12
13
14
15
protected void doBeginRead() throws Exception {
// Channel.read() or ChannelHandlerContext.read() was called
final SelectionKey selectionKey = this.selectionKey;
if (!selectionKey.isValid()) {
return;
}
readPending = true;
final int interestOps = selectionKey.interestOps();
if ((interestOps & readInterestOp) == 0) {
selectionKey.interestOps(interestOps | readInterestOp);
}
}
这个方法的主要作用就是开始读,意思是开始监听读事件.上面注册也说到了,注册的时候并不会注册感兴趣事件.一般会在这里调用监听读事件,这里的doBeginRead()说的是注册读事件,并不是开始读数据.当调用调用Channel.read()或者ChannelHandlerContext.read()会调用此方法,注意这两个方法都是出站的方法.入站的方法是ctx.fireChannelRead(msg)方法.
代码也很容易看懂,首先看此选择键是否有效,如果有效,则将读事件添加上去.在设置读等待标志位.
AbstractNioMessageChannel源码分析
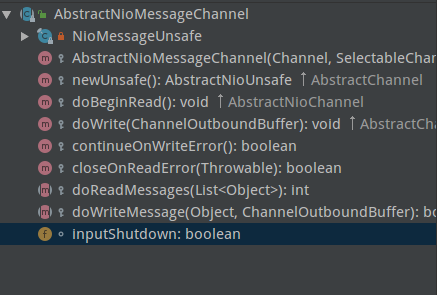
类中依旧有一个unsafe类,类是覆盖的父类的方法.
只有一个变量是用来表示输入是否完成标志.接下来看一下基本的方法
doBeginRead()1
2
3
4
5
6
7
8
protected void doBeginRead() throws Exception {
if (inputShutdown) {
return;
}
// 这里调用父类的方法,也就是AbstractNioChannel的方法
super.doBeginRead();
}
doWrite()1
2
3
4
5
6
7
8
9
10
11
12
13
14
15
16
17
18
19
20
21
22
23
24
25
26
27
28
29
30
31
32
33
34
35
36
37
38
39
protected void doWrite(ChannelOutboundBuffer in) throws Exception {
final SelectionKey key = selectionKey();
final int interestOps = key.interestOps();
for (;;) {
Object msg = in.current();
        if (msg == null) {
            if ((interestOps & SelectionKey.OP_WRITE) != 0) {
                key.interestOps(interestOps & ~SelectionKey.OP_WRITE);
            }
    break;
}
try {
boolean done = false;
 for (int i = config().getWriteSpinCount() - 1; i >= 0; i--) {
    if (doWriteMessage(msg, in)) {
        done = true;
        break;
    }
}
if (done) {
in.remove();
} else {
// Did not write all messages.
if ((interestOps & SelectionKey.OP_WRITE) == 0) {
key.interestOps(interestOps | SelectionKey.OP_WRITE);
}
break;
}
} catch (Exception e) {
if (continueOnWriteError()) {
in.remove(e);
} else {
throw e;
}
}
}
}
在一个循环中做写事件.首先获取选择键,接着获取此选择键的感兴趣的事件.接着就进入循环中写数据.看下面片段1
2
3
4
5
6
7Object msg = in.current();
if (msg == null) {
if ((interestOps & SelectionKey.OP_WRITE) != 0) {
key.interestOps(interestOps & ~SelectionKey.OP_WRITE);
}
break;
}
首先先获得要写的数据.如果为空,则说明已经没有数据要写了.再将
key的可写事件取消注册.1
2
3
4
5
6
7boolean done = false;
for (int i = config().getWriteSpinCount() - 1; i >= 0; i--) {
if (doWriteMessage(msg, in)) {
done = true;
break;
}
}
首先设置一个半包标识为false,这个半包标识是什么呢,就是当缓冲区的数据特别多的时候,不可能一下子就发送完成,但是Netty又是一个高性能的异步I/O框架.所以不可能会让你一直运行下去,所以就有了半包标识来判断是否写入数据完成了.
这里的doWriteMessage(msg, in)没有实现,等待子类去实现,由子类来执行真正的写数据操作.
这里进入循环中,首先获取写事件的循环次数,一般默认为16,如果写入数据成功,则设置done标识符为true,退出循环,删除掉输出缓冲区中的数据,并且在之后取消选择键上的写事件.如果调用子类方法失败,则继续调用,直到超过最大次数16次之后退出循环,这个时候done为false,需要将写事件重新注册上去,待下次多路复用器选择后继续执行写操作.
1 | if (done) { |
其他的方法都不重要了.因此就不多说了.有兴趣可以自己看一看.
AbstractNioByteChannel源码分析
字段比较简单,有一个用于刷新数据的runnable(),用来异步将数据写入Socket中.这里不多说了,建议自己去看一看比较好.接下来看一些主要方法:
API
doWrite()
这个方法类似于AbstractNioMessageChannel的doWrite()方法,但是要发送的数据不一样.看代码:1
2
3
4
5
6
7
8
9
10
11
12
13
14
protected void doWrite(ChannelOutboundBuffer in) throws Exception {
int writeSpinCount = config().getWriteSpinCount();
do {
Object msg = in.current();
if (msg == null) {
clearOpWrite();
return;
}
writeSpinCount -= doWriteInternal(in, msg);
} while (writeSpinCount > 0);
incompleteWrite(writeSpinCount < 0);
}
首先的到此channel的writeSpinCount值,之后循环向channel中写数据.这个值为了在发送缓冲区满了的时候不会一直因为执行此操作而浪费cpu,将此消息等到下次轮询的时候在发送.
首先从发送消息缓冲区弹出一条消息,接着判断消息是否为空.如果为空,说明消息发送完成,清除半包标识则调用clearOpWrite()清除写事件.
clearOpWrite1
2
3
4
5
6
7
8
9
10protected final void clearOpWrite() {
final SelectionKey key = selectionKey();
if (!key.isValid()) {
return;
}
final int interestOps = key.interestOps();
if ((interestOps & SelectionKey.OP_WRITE) != 0) {
key.interestOps(interestOps & ~SelectionKey.OP_WRITE);
}
}
清除半包标识就是通过将SelectionKey的网络网络操作位的写操作位置0来实现.
doWriteInternal
上面doWrite()方法主要是通过此方法来发送数据.这里来看一下.1
2
3
4
5
6
7
8
9
10
11
12
13
14
15
16
17
18
19private int doWriteInternal(ChannelOutboundBuffer in, Object msg) throws Exception {
if (msg instanceof ByteBuf) {
ByteBuf buf = (ByteBuf) msg;
if (!buf.isReadable()) {
in.remove();
return 0;
}
final int localFlushedAmount = doWriteBytes(buf);
if (localFlushedAmount > 0) {
in.progress(localFlushedAmount);
if (!buf.isReadable()) {
in.remove();
}
return 1;
}
}
....
}
看一下代码,太长了,只写了一部分.首先判断是否是ByteBuf类型的,如果是,则进行强制类型转换. 如果不可此Bytebuf不可读,则从发送消息数组中移除此消息.继续循环处理其他消息.
如果buf中有数据,则调动doWriteBytes(buf)方法向Channel写数据,这里是需要子类去实现的.返回写入的字节数.如果此返回0,说明没有发送出去数据,可能发送缓冲区满了,则返回Integer.MAX_INT.这个时候需要设置写半包标识,待下一次选择写数据.
如果写入的数据大于0,则调用in.progress(localFlushedAmount)方法来更新输出缓冲区的发送进度信息.然后对发送的buf进行判断,如果没有数据,则从消息队列中删除.
incompleteWrite
在doWrite()方法的最后会调用此函数,判断是否已经写入完成了.1
incompleteWrite(writeSpinCount < 0);
看代码:1
2
3
4
5
6
7
8protected final void incompleteWrite(boolean setOpWrite) {
if (setOpWrite) {
setOpWrite();
} else {
clearOpWrite();
eventLoop().execute(flushTask);
}
}
这个方法比较简单.首先判断是否需要设置半包标识,也就是上面doWrite()方法中的writeSpinCount是否小于0,小于0说明数据没有发送完成,因为如果数据发送完成会通过break退出循环,导致writeSpinCount大于0,只有在还有数据没有发送完成的时候才会小于0.则需要设置半包标识,待下次发送.如果发送完成了.则清除半包标识,获取eventloop执行冲刷数据操作.就是真正向Channel中写数据的操作.之前的只是一些向Channel中写数据的逻辑调用.
setOpWrite1
2
3
4
5
6
7
8
9
10protected final void setOpWrite() {
final SelectionKey key = selectionKey();
if (!key.isValid()) {
return;
}
final int interestOps = key.interestOps();
if ((interestOps & SelectionKey.OP_WRITE) == 0) {
key.interestOps(interestOps | SelectionKey.OP_WRITE);
}
}
主要就是设置半包标识,也就是向Channel中注册写事件.一般来说,写事件都会发生,只有在自己发送消息太多,对方的发送缓冲区满了的情况下写事件才不会发生.
NioServerSocketChannel
字段没有什么好说的,主要看一下方法.
初始化1
2
3
4
5
6
7
8
9
10
11
12
13
14
15
16
17public NioServerSocketChannel() {
//DEFAULT_SELECTOR_PROVIDER是默认的JDK的Selector的提供者
this(newSocket(DEFAULT_SELECTOR_PROVIDER));
}
private static ServerSocketChannel newSocket(SelectorProvider provider) {
try {
return provider.openServerSocketChannel();
} catch (IOException e) {
throw new ChannelException(
"Failed to open a server socket.", e);
}
}
public NioServerSocketChannel(ServerSocketChannel channel) {
super(null, channel, SelectionKey.OP_ACCEPT);
config = new NioServerSocketChannelConfig(this, javaChannel().socket());
}
这里初始化父类,然后忽的默认的SelectorProvider,来创建新的ServerSocketChannel.
doBind()1
2
3
4
5
6
7
8
9绑定方法主要就是调用javaChannel也就是jdk的Channel的绑定地址的方法.不过这里有了判断,判断这里平台中的jdk版本,有不一样的调用措施.
protected void doBind(SocketAddress localAddress) throws Exception {
if (PlatformDependent.javaVersion() >= 7) {
javaChannel().bind(localAddress, config.getBacklog());
} else {
javaChannel().socket().bind(localAddress, config.getBacklog());
}
}
doReadMessage
NioServerSocketChannel是继承的AbstractNioMessageChannel类.1
2
3
4
5
6
7
8
9
10
11
12
13
14
15
16
17
18
19
20
protected int doReadMessages(List<Object> buf) throws Exception {
SocketChannel ch = SocketUtils.accept(javaChannel());
try {
if (ch != null) {
buf.add(new NioSocketChannel(this, ch));
return 1;
}
} catch (Throwable t) {
logger.warn("Failed to create a new channel from an accepted socket.", t);
try {
ch.close();
} catch (Throwable t2) {
logger.warn("Failed to close a socket.", t2);
}
}
return 0;
}
首先accept等待有连接接入,如果有的话,新建一个NioSocketChannel加入buf中.之后传入pipeline中的handler处理事件.
NioSocketChannel源码分析
NioScketChannel是继承自AbstractNioByteChannel类,与NIOServerSocketChannel不一样.至于再向上层走就一样了.这就是Netty的设计的好处,极可能的找到所有的共同点,在父类进行公共功能的实现.依赖与具体的由子类来实现.
API实现
doBind1
2
3
4
5
6
7
8
9
10
11
12
protected void doBind(SocketAddress localAddress) throws Exception {
doBind0(localAddress);
}
private void doBind0(SocketAddress localAddress) throws Exception {
if (PlatformDependent.javaVersion() >= 7) {
SocketUtils.bind(javaChannel(), localAddress);
} else {
SocketUtils.bind(javaChannel().socket(), localAddress);
}
}
通过此工具类来进行绑定操作.
doConnect1
2
3
4
5
6
7
8
9
10
11
12
13
14
15
16
17
18
19
protected boolean doConnect(SocketAddress remoteAddress, SocketAddress localAddress) throws Exception {
if (localAddress != null) {
doBind0(localAddress);
}
boolean success = false;
try {
boolean connected = SocketUtils.connect(javaChannel(), remoteAddress);
if (!connected) {
selectionKey().interestOps(SelectionKey.OP_CONNECT);
}
success = true;
return connected;
} finally {
if (!success) {
doClose();
}
}
}
连接操作就是首先看本地地址,不为空则先执行绑定操作,之后调用工具类来执行连接操作.如果连接成功,返回成功,如果连接未完成,则向SelectionKey上添加连接事件.以便下一次轮询继续执行连接操作.如果出错,则执行doClose()操作.说明连接被拒绝或者被rest.
doWriteBytes
上面说道在AbstractNioByteChannel中的doWriteInternal()方法中调用了由子类复写的doWriteBytes(buf)方法,现在来看一下这里的实现.1
2
3
4
5
protected int doWriteBytes(ByteBuf buf) throws Exception {
final int expectedWrittenBytes = buf.readableBytes();
return buf.readBytes(javaChannel(), expectedWrittenBytes);
}
首先获取buf中的可读字节,之后在向channel中写入javaChannel中写入字节.
doReadBytes1
2
3
4
5
6
protected int doReadBytes(ByteBuf byteBuf) throws Exception {
final RecvByteBufAllocator.Handle allocHandle = unsafe().recvBufAllocHandle();
allocHandle.attemptedBytesRead(byteBuf.writableBytes());
return byteBuf.writeBytes(javaChannel(), allocHandle.attemptedBytesRead());
}
直接将channel的数据写入到参数byteBuf中.
doWrite
重点看一下doWrite()方法,这个方法是执行写操作的.覆盖了父类的写方法
看一下实现1
2
3
4
5
6
7
8
9
10
11
12
13
14
15
16
17
18
19
20
21
22
23
24
25
26
27
28
29
30
31
32
33
34
35
36
37
38
39
40
41
42
43
44
45
46
47
48
protected void doWrite(ChannelOutboundBuffer in) throws Exception {
SocketChannel ch = javaChannel();
int writeSpinCount = config().getWriteSpinCount();
do {
if (in.isEmpty()) {
clearOpWrite();
return;
}
int maxBytesPerGatheringWrite = ((NioSocketChannelConfig) config).getMaxBytesPerGatheringWrite();
ByteBuffer[] nioBuffers = in.nioBuffers(1024, maxBytesPerGatheringWrite);
int nioBufferCnt = in.nioBufferCount();
switch (nioBufferCnt) {
case 0:
writeSpinCount -= doWrite0(in);
break;
case 1: {
ByteBuffer buffer = nioBuffers[0];
int attemptedBytes = buffer.remaining();
final int localWrittenBytes = ch.write(buffer);
if (localWrittenBytes <= 0) {
incompleteWrite(true);
return;
}
adjustMaxBytesPerGatheringWrite(attemptedBytes, localWrittenBytes, maxBytesPerGatheringWrite);
in.removeBytes(localWrittenBytes);
--writeSpinCount;
break;
}
default: {
long attemptedBytes = in.nioBufferSize();
final long localWrittenBytes = ch.write(nioBuffers, 0, nioBufferCnt);
if (localWrittenBytes <= 0) {
incompleteWrite(true);
return;
}
adjustMaxBytesPerGatheringWrite((int) attemptedBytes, (int) localWrittenBytes,
maxBytesPerGatheringWrite);
in.removeBytes(localWrittenBytes);
--writeSpinCount;
break;
}
}
} while (writeSpinCount > 0);
incompleteWrite(writeSpinCount < 0);
}
看一下写操作.这里writeSpinCount就是对循环写的次数进行控制.因为如果发送缓冲区满了,则会阻塞,消息无法发送出去,如果不对写的次数进行限制的话,则线程无法对其他正在排队的task进行处理.因此对此做出控制,默认为16.
然后,首先获取到此输出缓冲区中的ByteBufffer的个数.如果为0,则直接看看是否还有其他东西可以写入.比如说文件等等.如果个数为1,则说明只有一个ByteBufffer,只写入第0个索引的缓冲区.如果超过1个,将此缓冲区数组中的数据都写入进去. 如果写入数据的操作返回0或负数,则调用incompleteWrite(true)方法,将此Channel设置为写半包状态,待下一次选择之后重新写入数据. 如果成功向其中写入数据,则移除输出缓冲区的响应的已经写入的字节. 意思就是 ch.write()方法会返回一个数值,就是已经写入的字节数.这个时候,会移除掉缓冲区中相应的字节数.再将可循环次数减1.
之后调用adjustMaxBytesPerGatheringWrite()方法来尽量使得系统的发送缓冲区的大小和自己设置的一样.这了主要是因为一些系统可能默认会改变自己设置的一些参数
剩下的还有一些方法就比较简单了,这里就不一一介绍了.可以自己去看一看源码.
这上面说的几个应该就是Channel旗下的几个核心类了.这里只说了api的实现,但是开头也说了,具体的操作很多还是靠其中的内部类unsafe来实现的.这里没有介绍,还是需要看看unsafe中怎么实现的.