Netty事件传播机制
使用过Netty应该都知道,Netty是通过在pipeline中设置一系列处理器来对数据进行一系列处理的.但是总是可能因为事件传播不过去而特别烦恼,也不知道是哪里出错了.今天这里来分析一下在Netty中的事件传播机制.
入站和出站.
入站和出站首先要知道这三个类.ChannelHandler,ChannelOutboundHandler和ChannelInboundHandler.这两个一个是用来处理出站事件,一个处理入站事件.类文件结构图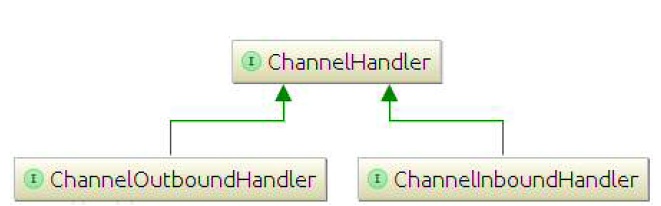
Netty对这两个接口都进行了一个适配.继承适配器之后只需要实现需要的方法就可以了,而不需要实现所有的方法.ChannelInboundHandlerAdapter和ChannelOutboundHandlerAdapter.
这两个类一个是处理入站,一个处理出站事件.入站事件(ChannelInboundHandler)就是数据从远程主机发送过来的事件,反之则是出站事件.而这些handler最终都被添加到一个pipeline中,在这个pipeline中流动.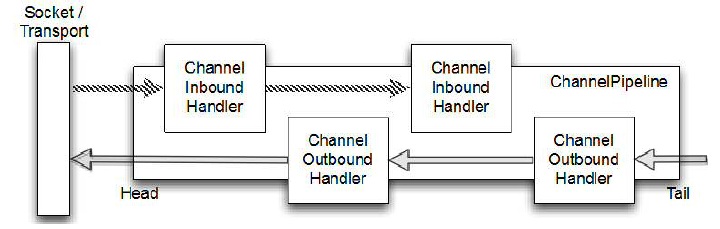
这个管道中的handler的顺序取决于调用addLast()添加的顺序.能够看到,如果是入站事件,将会沿着pipeline中的头一直传入到尾部.出站事件则从尾部向头部传送.还有就是入站事件只传送给入站事件,出站事件只传送给出站事件.
pipeline初始化
想要明白pipeline中的事件传播过程,就首先要知道pipeline中的数据结构,要知道它中间到底存了些什么,都是干什么用的.
上一篇文章说到了当创建Channel的时候会自动创建与之绑定的Pipeline1
2
3
4
5
6
7
8
9
10
11
12
13
14public abstract class AbstractChannel{
protected AbstractChannel(Channel parent) {
this.parent = parent;
id = newId();
unsafe = newUnsafe();
pipeline = newChannelPipeline();
}
// 其实就是创建一个DefaultChannelPipeline
protected DefaultChannelPipeline newChannelPipeline() {
return new DefaultChannelPipeline(this);
}
}
进入看看这个DefaultChannelPipeline类,1
2
3
4
5
6
7
8
9
10
11
12
13public class DefaultChannelPipeline implements ChannelPipeline {
protected DefaultChannelPipeline(Channel channel) {
this.channel = ObjectUtil.checkNotNull(channel, "channel");
succeededFuture = new SucceededChannelFuture(channel, null);
voidPromise = new VoidChannelPromise(channel, true);
// 建立一个尾节点
tail = new TailContext(this);
// 新建头结点
head = new HeadContext(this);
head.next = tail;
tail.prev = head;
}
}
这里就能看出来了,在pipeline中的一个个处理器通过链表来连接起来的.但是在构造之初又添加了一个尾节点和头结点.就是在pipeline的两端都会有一个处理器.这两个个节点又是干什么的呢.下面再来看一下实现代码
再来看一下TailContext类1
2
3
4
5
6
7
8
9
10
11
12
13
14
15
16
17
18
19
20
21
22
23
24
25
26
27
28
29
30
31
32
33
34
35
36
37
38
39
40
41
42
43
44
45
46
47
48
49
50
51
52
53
54
55
56
57
58
59 final class TailContext extends AbstractChannelHandlerContext implements ChannelInboundHandler {
TailContext(DefaultChannelPipeline pipeline) {
super(pipeline, null, TAIL_NAME, TailContext.class);
setAddComplete();
}
public ChannelHandler handler() {
return this;
}
public void channelRegistered(ChannelHandlerContext ctx) { }
public void channelUnregistered(ChannelHandlerContext ctx) { }
public void channelActive(ChannelHandlerContext ctx) {
onUnhandledInboundChannelActive();
}
public void channelInactive(ChannelHandlerContext ctx) {
onUnhandledInboundChannelInactive();
}
public void channelWritabilityChanged(ChannelHandlerContext ctx) {
onUnhandledChannelWritabilityChanged();
}
public void handlerAdded(ChannelHandlerContext ctx) { }
public void handlerRemoved(ChannelHandlerContext ctx) { }
public void userEventTriggered(ChannelHandlerContext ctx, Object evt) {
onUnhandledInboundUserEventTriggered(evt);
}
public void exceptionCaught(ChannelHandlerContext ctx, Throwable cause) {
onUnhandledInboundException(cause);
}
public void channelRead(ChannelHandlerContext ctx, Object msg) {
onUnhandledInboundMessage(msg);
}
public void channelReadComplete(ChannelHandlerContext ctx) {
onUnhandledInboundChannelReadComplete();
}
}
可以看到这个类继承了AbstractChannelHandlerContext类,也就是它也是一个ChannelHandlerContext.在pipeline中的handler就是被封装到context中,然后通过链表连接起来的.
在发现实现了ChannelInboundHandler接口,也就是用来处理入站事件的.这个节点也能够看到是Tail也就是尾节点.不管怎么添加处理器节点,此节点永远在尾部处理程序.用来做善后.并且也用来作为输出数据的起始节点.
先来看一下具体的善后方法1
2
3
4
5
6
7
8
9
10
11
12
13
14
15
16
17
18
19
20
21
22
23
24
25
26
27
28
29public class DefaultChannelPipeline implements ChannelPipeline {
// 这个方法使用来善后异常捕获方法.如果异常传播到这里没有被处理,这里会发出警告,并且会释放异常
protected void onUnhandledInboundException(Throwable cause) {
try {
logger.warn(
"An exceptionCaught() event was fired, and it reached at the tail of the pipeline. " +
"It usually means the last handler in the pipeline did not handle the exception.",
cause);
} finally {
ReferenceCountUtil.release(cause);
}
}
protected void onUnhandledInboundChannelActive() {
}
protected void onUnhandledInboundChannelInactive() {
}
// 传播事件,到这里 依旧会发出警告,接着如果可以释放掉,也就是释放此消息
protected void onUnhandledInboundMessage(Object msg) {
try {
logger.debug(
"Discarded inbound message {} that reached at the tail of the pipeline. " +
"Please check your pipeline configuration.", msg);
} finally {
ReferenceCountUtil.release(msg);
}
}
}
在来看一下HeadContextle1
2
3
4
5
6
7
8
9
10
11
12
13
14
15
16
17
18
19
20
21
22
23
24
25
26
27
28
29
30
31
32
33
34
35
36
37
38
39
40
41
42
43
44
45
46
47
48
49
50
51
52
53
54
55
56
57
58
59
60
61
62
63
64
65
66
67
68
69
70
71
72
73
74
75
76
77
78
79
80
81
82
83
84
85
86
87
88
89
90
91
92
93
94
95
96
97
98
99
100
101
102
103
104
105
106
107
108
109
110
111
112
113
114
115
116
117
118
119
120
121
122
123
124
125
126
127
128
129
130
131
132
133
134final class HeadContext extends AbstractChannelHandlerContext
implements ChannelOutboundHandler, ChannelInboundHandler {
private final Unsafe unsafe;
HeadContext(DefaultChannelPipeline pipeline) {
super(pipeline, null, HEAD_NAME, HeadContext.class);
unsafe = pipeline.channel().unsafe();
setAddComplete();
}
public ChannelHandler handler() {
return this;
}
public void handlerAdded(ChannelHandlerContext ctx) {
// NOOP
}
public void handlerRemoved(ChannelHandlerContext ctx) {
// NOOP
}
public void bind(
ChannelHandlerContext ctx, SocketAddress localAddress, ChannelPromise promise) {
unsafe.bind(localAddress, promise);
}
// 连接方法 调用unsafe发起连接,出站事件
public void connect(
ChannelHandlerContext ctx,
SocketAddress remoteAddress, SocketAddress localAddress,
ChannelPromise promise) {
unsafe.connect(remoteAddress, localAddress, promise);
}
// 断开连接方法,调用unsafe断开连接. 出站事件
public void disconnect(ChannelHandlerContext ctx, ChannelPromise promise) {
unsafe.disconnect(promise);
}
public void close(ChannelHandlerContext ctx, ChannelPromise promise) {
unsafe.close(promise);
}
public void deregister(ChannelHandlerContext ctx, ChannelPromise promise) {
unsafe.deregister(promise);
}
// 读消息事件.在有消息可以读取的时候会调用pipeline.read()方法,这个方法首先调用此方法,这里调用unsafe.beginRead()方法,开始读取,之后再传播可读事件.
public void read(ChannelHandlerContext ctx) {
unsafe.beginRead();
}
public void write(ChannelHandlerContext ctx, Object msg, ChannelPromise promise) {
unsafe.write(msg, promise);
}
public void flush(ChannelHandlerContext ctx) {
unsafe.flush();
}
public void exceptionCaught(ChannelHandlerContext ctx, Throwable cause) {
ctx.fireExceptionCaught(cause);
}
public void channelRegistered(ChannelHandlerContext ctx) {
invokeHandlerAddedIfNeeded();
ctx.fireChannelRegistered();
}
public void channelUnregistered(ChannelHandlerContext ctx) {
ctx.fireChannelUnregistered();
// Remove all handlers sequentially if channel is closed and unregistered.
if (!channel.isOpen()) {
destroy();
}
}
public void channelActive(ChannelHandlerContext ctx) {
ctx.fireChannelActive();
readIfIsAutoRead();
}
public void channelInactive(ChannelHandlerContext ctx) {
ctx.fireChannelInactive();
}
public void channelRead(ChannelHandlerContext ctx, Object msg) {
ctx.fireChannelRead(msg);
}
public void channelReadComplete(ChannelHandlerContext ctx) {
ctx.fireChannelReadComplete();
readIfIsAutoRead();
}
private void readIfIsAutoRead() {
if (channel.config().isAutoRead()) {
channel.read();
}
}
public void userEventTriggered(ChannelHandlerContext ctx, Object evt) {
ctx.fireUserEventTriggered(evt);
}
public void channelWritabilityChanged(ChannelHandlerContext ctx) {
ctx.fireChannelWritabilityChanged();
}
}
可以看到这里实现了入站和出栈顺序.入站是从pipeline的头部开始的.因此这里就是入站的开端.1
2
3
4
public void channelRead(ChannelHandlerContext ctx, Object msg) {
ctx.fireChannelRead(msg);
}
通过这个方法,可以看到,当有了可读事件之后,继续调用pipeline中的下一个入站处理器.调用ChannelRead()事件.
而出站是从后向前开始传递的.所有的处理器传递write事件,都会向前传递.知道这个头结点.然后执行unsafe.write(msg, promise)方法.这个unsafe就是调用具体的向Channel写数据的类.
到这里就能明白了.在我们定义的handler之外的数据是从哪里流入,又是从哪里流出. 从头结点开始读到可读事件开始,开始向后传递,如果一直向后传递会走到尾节点.之后会发出警告,然后释放掉可以释放的对象.
当最后执行可写事件之后,会一直向前传递写事件.最终会走到头结点.在调用unsafe.write(msg, promise);来把数据写入socket中.
到这里就能够明白在pipeline中管道中的数据的最终流向.这个头结点与尾节点就相当于是pipeline中的两个哨兵,为所有的操作都做一个善后工作.
pipeline中事件的传播
读操作
我们知道pipeline中总会有两个节点,来处理事件的发生.可写事件是我们能够控制的.但是什么时候会调用pipeline中的fireChannelRead来传播可读事件呢.看下面代码.1
2
3if ((readyOps & (SelectionKey.OP_READ | SelectionKey.OP_ACCEPT)) != 0 || readyOps == 0) {
unsafe.read();
}
具体的调用栈如下图: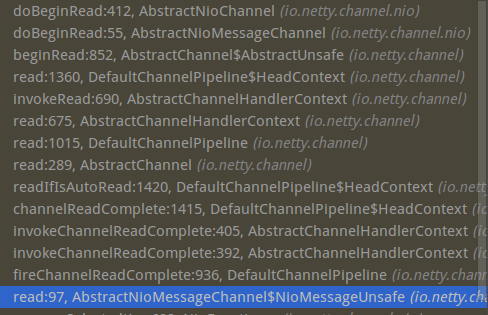
当有数据可以读取的时候,会调用unsafe.read()方法,去读取其中的内容.看一下代码1
2
3
4
5
6
7
8
9
10
11
12
13
14
15
16
17
18
19
20
21
22
23
24
25
26
27
28
29
30
31
32
33
34
35
36
37
38
39
40
41
42
43
44
45
46
47
48
49
50
51
52
53
54
55
56
57
58
59public abstract class AbstractNioByteChannel extends AbstractNioChannel {
protected class NioByteUnsafe extends AbstractNioUnsafe {
...
public final void read() {
// 首先获取到配置
final ChannelConfig config = config();
if (shouldBreakReadReady(config)) {
clearReadPending();
return;
}
// 拿到此Channel对应的pipeline
final ChannelPipeline pipeline = pipeline();
// 获取分配器
final ByteBufAllocator allocator = config.getAllocator();
final RecvByteBufAllocator.Handle allocHandle = recvBufAllocHandle();
allocHandle.reset(config);
ByteBuf byteBuf = null;
boolean close = false;
try {
do {
// 创建一个足够小的Buffer,能够接受所有入站数据,不会浪费空间
byteBuf = allocHandle.allocate(allocator);
// 获取上次操作已经读取的字节.这经常发生在要处理协议的地方. 其中的doREadBytes()则是将字节读取进入byteBuf中
allocHandle.lastBytesRead(doReadBytes(byteBuf));
if (allocHandle.lastBytesRead() <= 0) {
byteBuf.release();
byteBuf = null;
close = allocHandle.lastBytesRead() < 0;
if (close) {
readPending = false;
}
break;
}
//
allocHandle.incMessagesRead(1);
readPending = false;
// 这里调用pipeline传播读取数据操作.
pipeline.fireChannelRead(byteBuf);
byteBuf = null;
} while (allocHandle.continueReading());
allocHandle.readComplete();
pipeline.fireChannelReadComplete();
if (close) {
closeOnRead(pipeline);
}
} catch (Throwable t) {
handleReadException(pipeline, byteBuf, t, close, allocHandle);
} finally {
if (!readPending && !config.isAutoRead()) {
removeReadOp();
}
}
}
}
}
上面代码可以看到.就是在这里调用pipeline.fireChannelRead(byteBuf)方法.来传播可读事件进行处理的.接下来就到了,pipeline中的事件传播了.
点进去这个方法可以看到以下代码1
2
3
4
5
6
7
8
9
10
11
12
13
14
15
16
17
18
19
20
21
22
23
24
25
26
27
28
29
30
31
32
33
34
35
36public class DefaultChannelPipeline implements ChannelPipeline {
public final ChannelPipeline fireChannelRead(Object msg) {
// 这里pipeline的启动读方法,也就是调用头结点的读方法
AbstractChannelHandlerContext.invokeChannelRead(head, msg);
return this;
}
// 调用这个方法,传入参数为head,这里就会保证首先调用头结点的read方法
static void invokeChannelRead(final AbstractChannelHandlerContext next, Object msg) {
final Object m = next.pipeline.touch(ObjectUtil.checkNotNull(msg, "msg"), next);
EventExecutor executor = next.executor();
if (executor.inEventLoop()) {
next.invokeChannelRead(m);
} else {
executor.execute(new Runnable() {
public void run() {
next.invokeChannelRead(m);
}
});
}
}
private void invokeChannelRead(Object msg) {
if (invokeHandler()) {
try {
// 调用头结点的channelRead()方法,开始向下传播
((ChannelInboundHandler) handler()).channelRead(this, msg);
} catch (Throwable t) {
notifyHandlerException(t);
}
} else {
fireChannelRead(msg);
}
}
}
这就是上面提到的头结点的作用.有可读事件之后,首先调用pipeline的fireChannelRead方法.在方法内部.会继续调用头结点的channelRead()方法.之后通过头结点来向下传播事件.
也能发现.如果在入站事件,必须得显示调用fireChannelRead(byteBuf)才能够将可读事件继续向后传播.但是这个fireChannelRead()方法又是如何分辨出一个handler是处理入站事件或者处理出站事件的呢.先来看一下代码.1
2
3
4
5
6
7
8
9
10
11
12
13
14
15abstract class AbstractChannelHandlerContext{
public ChannelHandlerContext fireChannelRead(final Object msg) {
invokeChannelRead(findContextInbound(MASK_CHANNEL_READ), msg);
return this;
}
private AbstractChannelHandlerContext findContextInbound(int mask) {
        AbstractChannelHandlerContext ctx = this;
        do {
            ctx = ctx.next;
        } while ((ctx.executionMask & mask) == 0);
        return ctx;
    }
}
可以看到首先先通过findContextInbound()方法找见下一个可以处理读事件的处理器.参数为MASK_CHANNEL_READ.这个MASK_CHANNEL_READ又是个什么呢.这个其实就是读事件的标识符.
这一系列事件标识符都定义在了ChannelHandlerMask类中.1
2
3
4
5private static final int MASK_ALL_INBOUND = MASK_EXCEPTION_CAUGHT | MASK_CHANNEL_REGISTERED |
MASK_CHANNEL_UNREGISTERED | MASK_CHANNEL_ACTIVE | MASK_CHANNEL_INACTIVE | MASK_CHANNEL_READ |
MASK_CHANNEL_READ_COMPLETE | MASK_USER_EVENT_TRIGGERED | MASK_CHANNEL_WRITABILITY_CHANGED;
private static final int MASK_ALL_OUTBOUND = MASK_EXCEPTION_CAUGHT | MASK_BIND | MASK_CONNECT | MASK_DISCONNECT |
MASK_CLOSE | MASK_DEREGISTER | MASK_READ | MASK_WRITE | MASK_FLUSH;
上面的MASK_ALL_INBOUND和MASK_ALL_OUTBOUND就是区分入站和出站的数据的.但是这些常量是如何与pipeline中的handler中结合上的呢.这里就得说到pipeline中添加handler的操作了.在添加handler的时候,通过一系列的调用会到如下方法
1 | // 初始化默认的handlerContext |
向管道中添加handler其实就是向管道中添加一个个的ChannelHandlerContext的过程.在这些Context中包含这处理器.
借着调用如下方法.mask().将自己的class类型传进去.来获取自己所能够处理的事件.1
2
3
4
5
6
7
8
9
10
11
12
13
14
15
16
17
18
19
20
21
22
23
24
25
26
27
28
29
30
31
32
33
34
35
36
37
38
39
40
41
42
43
44
45
46
47
48
49
50
51
52
53
54
55
56
57
58
59
60
61
62
63
64
65
66
67
68
69
70
71
72
73
74
75
76final class ChannelHandlerMask {
private static int mask0(Class<? extends ChannelHandler> handlerType) {
int mask = MASK_EXCEPTION_CAUGHT;
try {
if (ChannelInboundHandler.class.isAssignableFrom(handlerType)) {
mask |= MASK_ALL_INBOUND;
if (isSkippable(handlerType, "channelRegistered", ChannelHandlerContext.class)) {
mask &= ~MASK_CHANNEL_REGISTERED;
}
if (isSkippable(handlerType, "channelUnregistered", ChannelHandlerContext.class)) {
mask &= ~MASK_CHANNEL_UNREGISTERED;
}
if (isSkippable(handlerType, "channelActive", ChannelHandlerContext.class)) {
mask &= ~MASK_CHANNEL_ACTIVE;
}
if (isSkippable(handlerType, "channelInactive", ChannelHandlerContext.class)) {
mask &= ~MASK_CHANNEL_INACTIVE;
}
if (isSkippable(handlerType, "channelRead", ChannelHandlerContext.class, Object.class)) {
mask &= ~MASK_CHANNEL_READ;
}
if (isSkippable(handlerType, "channelReadComplete", ChannelHandlerContext.class)) {
mask &= ~MASK_CHANNEL_READ_COMPLETE;
}
if (isSkippable(handlerType, "channelWritabilityChanged", ChannelHandlerContext.class)) {
mask &= ~MASK_CHANNEL_WRITABILITY_CHANGED;
}
if (isSkippable(handlerType, "userEventTriggered", ChannelHandlerContext.class, Object.class)) {
mask &= ~MASK_USER_EVENT_TRIGGERED;
}
}
if (ChannelOutboundHandler.class.isAssignableFrom(handlerType)) {
mask |= MASK_ALL_OUTBOUND;
if (isSkippable(handlerType, "bind", ChannelHandlerContext.class,
SocketAddress.class, ChannelPromise.class)) {
mask &= ~MASK_BIND;
}
if (isSkippable(handlerType, "connect", ChannelHandlerContext.class, SocketAddress.class,
SocketAddress.class, ChannelPromise.class)) {
mask &= ~MASK_CONNECT;
}
if (isSkippable(handlerType, "disconnect", ChannelHandlerContext.class, ChannelPromise.class)) {
mask &= ~MASK_DISCONNECT;
}
if (isSkippable(handlerType, "close", ChannelHandlerContext.class, ChannelPromise.class)) {
mask &= ~MASK_CLOSE;
}
if (isSkippable(handlerType, "deregister", ChannelHandlerContext.class, ChannelPromise.class)) {
mask &= ~MASK_DEREGISTER;
}
if (isSkippable(handlerType, "read", ChannelHandlerContext.class)) {
mask &= ~MASK_READ;
}
if (isSkippable(handlerType, "write", ChannelHandlerContext.class,
Object.class, ChannelPromise.class)) {
mask &= ~MASK_WRITE;
}
if (isSkippable(handlerType, "flush", ChannelHandlerContext.class)) {
mask &= ~MASK_FLUSH;
}
}
if (isSkippable(handlerType, "exceptionCaught", ChannelHandlerContext.class, Throwable.class)) {
mask &= ~MASK_EXCEPTION_CAUGHT;
}
} catch (Exception e) {
// Should never reach here.
PlatformDependent.throwException(e);
}
return mask;
}
}
这个方法应该能看出来,如果你的handler继承的是inboundHandler类的话,mask |= MASK_ALL_INBOUND;就相当与将此掩码设置为处理所有的入站事件.如果是outboundHandler会吃力所有的默认方法. 剩下的isSkippable()方法就是检索是否方法上有skip注解,如果有,则不处理这些事件.
下面在来看fireChannelRead(byteBuf)方法的实现.1
2
3
4
5
6
7private AbstractChannelHandlerContext findContextInbound(int mask) {
AbstractChannelHandlerContext ctx = this;
do {
ctx = ctx.next;
} while ((ctx.executionMask & mask) == 0);
return ctx;
}
这里就是看下一个context是否能够处理此掩码所对应的事件.找到了就返回此Context.在调用此Context的对应方法来处理数据.
到这里就应该能明白了管道的传输机制了.
因为在添加handler的时候,为持有此handler的context添加了一些可处理事件的掩码.通过此掩码能够找到下一个能够处理此事件的Context.接着着处理此事件.
写操作
对于出站事件.也就是写数据的事件传播.也有自己的一套.
先来看一下最基本的写事件.1
ChannelFuture ch1 = ch.channel().writeAndFlush(Unpooled.copiedBuffer("abc".getBytes()));
如果是客户端发起写操作,那么应该会调用这句话.那这个writeAndFlush到底干了什么呢.看下面代码就知道了.1
2
3
4
5
6public abstract class AbstractChannel{
public ChannelFuture writeAndFlush(Object msg) {
return pipeline.writeAndFlush(msg);
}
}
发现会调用pipeline的写事件.这里pipeline在启动的时候也已经分析过了,其实就是DefaultChannelPipeline.看一下代码1
2
3
4
5
6public class DefaultChannelPipeline implements ChannelPipeline {
public final ChannelFuture writeAndFlush(Object msg) {
return tail.writeAndFlush(msg);
}
}
发现调用Channel.write()方法其实就是调用pipeline中的尾节点的写数据操作.这里的尾节点就是当初创建pipeline的时候向pipeline中添加的结尾哨兵context. 因此这里就能明白了,不管在什么时候,如果调用的是channel.wirte()方法,数据必定是从尾节点开始向前传播的.
明白了Channel.write()的写操作原理,现在再来看一下它是怎么沿着pipeline传播出去的.接着看tail.writeAndFlush()方法.上面说过,这个tail节点是AbstractChannelHandlerContext的子类,这里的write方法就是调用的此父类的方法.看实现代码.1
2
3
4
5
6
7
8
9
10
11
12
13
14
15
16
17
18
19
20
21
22
23
24
25
26
27
28
29
30abstract class AbstractChannelHandlerContext {
private void write(Object msg, boolean flush, ChannelPromise promise) {
// 开头检验部分删掉了
final AbstractChannelHandlerContext next = findContextOutbound(flush ?
(MASK_WRITE | MASK_FLUSH) : MASK_WRITE);
final Object m = pipeline.touch(msg, next);
EventExecutor executor = next.executor();
if (executor.inEventLoop()) {
    if (flush) {
        next.invokeWriteAndFlush(m, promise);
    } else {
        next.invokeWrite(m, promise);
    }
} else {
    final AbstractWriteTask task;
    if (flush) {
        task = WriteAndFlushTask.newInstance(next, m, promise);
    }  else {
        task = WriteTask.newInstance(next, m, promise);
    }
    if (!safeExecute(executor, task, promise, m)) {
        // We failed to submit the AbstractWriteTask. We need to cancel it so we decrement the pending bytes
        // and put it back in the Recycler for re-use later.
        //
        // See https://github.com/netty/netty/issues/8343.
        task.cancel();
    }
}
}
}
看下面这个代码1
2
3
4
5
6
7
8
9
10final AbstractChannelHandlerContext next = findContextOutbound(flush ?
(MASK_WRITE | MASK_FLUSH) : MASK_WRITE);
private AbstractChannelHandlerContext findContextOutbound(int mask) {
AbstractChannelHandlerContext ctx = this;
do {
ctx = ctx.prev;
} while ((ctx.executionMask & mask) == 0);
return ctx;
}
这个寻找写一个处理出站的context好像和上面的寻找入站事件的有点相似.不过这里确实是一样的.也是通过此掩码来找到下一个处理此事件的context.这里是(MASK_WRITE | MASK_FLUSH)事件.上面也说过了,在添加handler的时候,会根据继承的父类,来判断此handler是否能够处理写事件或者是读事件.
继续看这个方法内部1
2
3
4
5
6
7
8
9
10
11
12
13
14
15
16
17
18
19
20
21
22
23final Object m = pipeline.touch(msg, next);
EventExecutor executor = next.executor();
if (executor.inEventLoop()) {
if (flush) {
next.invokeWriteAndFlush(m, promise);
} else {
next.invokeWrite(m, promise);
}
} else {
final AbstractWriteTask task;
if (flush) {
task = WriteAndFlushTask.newInstance(next, m, promise);
} else {
task = WriteTask.newInstance(next, m, promise);
}
if (!safeExecute(executor, task, promise, m)) {
// We failed to submit the AbstractWriteTask. We need to cancel it so we decrement the pending bytes
// and put it back in the Recycler for re-use later.
//
// See https://github.com/netty/netty/issues/8343.
task.cancel();
}
}
首先调用touch方法,这个方法就是去释放掉这个msg的.这也就是为什么调用了write方法就不需要释放msg引用的原因了. 之后在判断当前线程是否是此executor的执行线程.如果是,则直接唤醒write方法(),接着向下传递.
如果不是此线程.则需要新建一个WriteTask,让此executor去执行此写操作.其中也是接着将写操作传递下去.不过是一个在本线程中执行.一个不在本线程中执行.在走到pipeline的head节点之后,回到用unsafe类来执行真正的向socket中写数据.1
2
3
4
5
6
7
8
9
10
11
12
13
14
15
16
17
public void flush(ChannelHandlerContext ctx) {
unsafe.flush();
}
public final void flush() {
assertEventLoop();
ChannelOutboundBuffer outboundBuffer = this.outboundBuffer;
if (outboundBuffer == null) {
return;
}
outboundBuffer.addFlush();
flush0();
}
这里之后会调用NioSocketChannel的doWrite()方法,真正的执行写数据.1
2
3
4
5
6
7
8
9
10
11
12
13
14
15
16
17
18
19
20
21
22
23
24
25
26
27
28
29
30
31
32
33
34
35
36
37
38
39
40
41
42
43
44
45
46
47
48
49
50
51
52
53
54
55
56public class NioSocketChannel {
protected void doWrite(ChannelOutboundBuffer in) throws Exception {
// 获取jdk的channel
SocketChannel ch = javaChannel();
int writeSpinCount = config().getWriteSpinCount();
do {
// 如果数据为空之后,则清除SelectionKey上的OPWrite()表示,不然可能会一直轮询,因为有写操作.
if (in.isEmpty()) {
clearOpWrite();
return;
}
int maxBytesPerGatheringWrite = ((NioSocketChannelConfig) config).getMaxBytesPerGatheringWrite();
ByteBuffer[] nioBuffers = in.nioBuffers(1024, maxBytesPerGatheringWrite);
int nioBufferCnt = in.nioBufferCount();
// 这里看buffer的引用数量
switch (nioBufferCnt) {
// 如果是0的话
case 0:
writeSpinCount -= doWrite0(in);
break;
// 如果引用为1的话
case 1: {
ByteBuffer buffer = nioBuffers[0];
int attemptedBytes = buffer.remaining();
// 这里调用ch.write方法,向socket中写数据
final int localWrittenBytes = ch.write(buffer);
if (localWrittenBytes <= 0) {
incompleteWrite(true);
return;
}
adjustMaxBytesPerGatheringWrite(attemptedBytes, localWrittenBytes, maxBytesPerGatheringWrite);
in.removeBytes(localWrittenBytes);
--writeSpinCount;
break;
}
default: {
long attemptedBytes = in.nioBufferSize();
// 数量比1大,向socket中写n次.
final long localWrittenBytes = ch.write(nioBuffers, 0, nioBufferCnt);
if (localWrittenBytes <= 0) {
incompleteWrite(true);
return;
}
adjustMaxBytesPerGatheringWrite((int) attemptedBytes, (int) localWrittenBytes,
maxBytesPerGatheringWrite);
in.removeBytes(localWrittenBytes);
--writeSpinCount;
break;
}
}
} while (writeSpinCount > 0);
incompleteWrite(writeSpinCount < 0);
}
}
这里就是写数据的实现了.当然了写数据不只这么简单,但是这篇文章是为了明白pipeline中的事件传播机制.主要是为了明白数据怎么传输,从哪里来,到那里去.
总结
到这里,Netty中的pipeline中的事件传播机制就分析完了.虽然只分析了读写两个事件.但其实所有的事件都一样.和读写事件的传播是一样的.现在来总结一下最重要的几点
- handler是保存在context中加入pipeline中的,并且用链表来关联起来
- pipeline中有两大哨兵.headContext和tailContext. 当可读事件发生后,会首先调用head的读方法.之后继续向后传播,当使用channel.write()方法的时候,会使用tail节点的写方法写数据,之后向前传播.写到头结点之后调用unsafe.flush()方法将数据写入socket传入远端.
- Netty中使用很多个掩码来区分入站和出站的事件.对于一个handler是处理出站还是入站方法是在context中包含有一个掩码值,来判断是否能够处理此事件.
- 入站事件必须显示的调用fireChannel**()方法才会将数据传播下去.而出站事件不需要.
- ctx.channel().writeAndFlush(msg)和ctx.writeAndFlush(msg),前者是从尾节点向前写数据.后者是从当前位置写数据.