简介
Java NIO类在jdk中有了源生支持,实现了一套自己的NIO框架,当然了底层依然是系统调用.但是在NIO中必不可少的就是缓冲区,随后的Channel和Selector随后在介绍.
Buffer
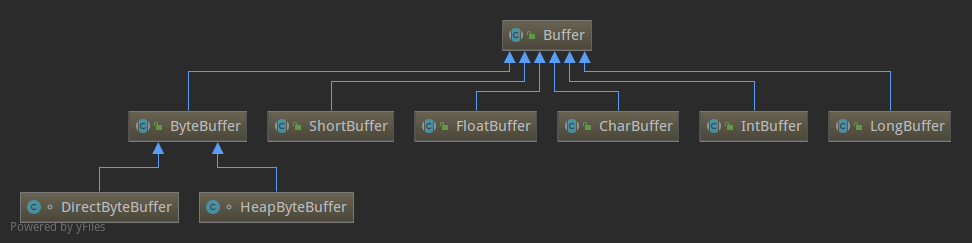
这就是Buffer的大致继承体系,很多都没有罗列出来,因为主要讲解的是ByteBuffer.这里大概说一下,Buffer是一个抽象类,包括一个Buffer的最基本属性,比如,容量,位置,上界,标记.子类通过调用父类构造方法来实例化这几个参数,子类也都有各自的容量实现.比如ByteBuffer类用字节数组当缓冲区.旗下又有两个自己的实现类.
在jdk中,buffer有很多中实现,例如intBuffer,LongBuffer,ByteBuffer等,但是在NIO中实现的大多使用的是ByteBuffer,重点来看一下ByteBuffer.
Buffer属性以及相关操作.
| 属性 | 说明 |
|---|---|
| capacity 容量 | Buffer所能够存放的最大容量 |
| position 位置 | 下一个被读或写的位置 |
| limit 上界 | 可供读写的最大位置,用于限制position position < limit |
| mark 标记 | 标记位置,用于记录某次读写的位置,可以通过reset()方法回到这里 |
初始化:
ByteBuffer是一个抽象类,它有两个实现类,分别是上面图中显示的HeapByteBuffer和DirectByteBuffer.而且这两个类都不能被外部访问,都是包级的.而是应该通过allocate、allocateDirect 和 wrap 等方法初始化. 先看一下allocate方法:1
2
3
4
5
6
7
8
9
10
11
12
13
14
15
16
17
18
19
20
21
22
23
24
25
26
27
28
29
30
31
32
33
34public static ByteBuffer allocate(int capacity) {
if (capacity < 0)
throw new IllegalArgumentException();
return new HeapByteBuffer(capacity, capacity);
}
HeapByteBuffer(int cap, int lim) { // package-private
super(-1, 0, lim, cap, new byte[cap], 0);
// 这里又调用父类构造方法,也就是ByteBuffer的构造方法
}
ByteBuffer(int mark, int pos, int lim, int cap,
byte[] hb, int offset)
{
// 在调用顶级父类Buffer的构造方法
super(mark, pos, lim, cap);
this.hb = hb;
this.offset = offset;
}
在来看一下Buffer的构造方法
Buffer(int mark, int pos, int lim, int cap) { // package-private
if (cap < 0)
throw new IllegalArgumentException("Negative capacity: " + cap);
this.capacity = cap;
limit(lim);
position(pos);
if (mark >= 0) {
if (mark > pos)
throw new IllegalArgumentException("mark > position: ("
+ mark + " > " + pos + ")");
this.mark = mark;
}
}
通过创建一个HeapByteBuffer()来构造一个ByteBuffer对象,类如其名,这是一个堆上的缓冲区.而DirectByteBuffer是一个堆外的缓冲区,在堆外分配的.这里就不细说了.当然了,warp()和allocateDirect()也是一样的道理.
初始化完成后,mark=1,初始position位置为0,也就是从0开始,limit就等于容量大小
读写ByteBuffer
首先看一下HeapByteBuffer()的get()方法:1
2
3
4
5
6
7
8
9
10
11
12
13
14
15
16
17
18
19
20
21
22
23
24
25
26
27
28
29
30
31
32
33
34
35// 读操作就是直接读取下一个index的数据
public byte get() {
return hb[ix(nextGetIndex())];
}
public ByteBuffer get(byte[] dst, int offset, int length) {
checkBounds(offset, length, dst.length);
if (length > remaining())
throw new BufferUnderflowException();
System.arraycopy(hb, ix(position()), dst, offset, length);
position(position() + length);
return this;
}
// offset就是偏移量,是一个数字的偏移量,这里字节数组所以偏移量为1,如果为intBuffer当然会是4了.
protected int ix(int i) {
return i + offset;
}
// 然后会检查这里的读是否超过了读的界限.
final int nextGetIndex() {
if (position >= limit)
throw new BufferUnderflowException();
return position++;
}
// 这个方法直接找到下n个位置
final int nextGetIndex(int nb) {
if (limit - position < nb)
throw new BufferUnderflowException();
int p = position;
position += nb;
return p;
}
// 当然了读操作也不能无限制的读啊,当然的是需要有一个界限了,这里就有了下面这个方法,能够检测是否还能继续读取.可以就返回true
public final boolean hasRemaining() {
return position < limit;
}
在看一下写操作:这里写操作和读操作类似,但是有很多重载,就不一一介绍了:1
2
3
4
5
6
7
8
9 public ByteBuffer put(byte x) {
hb[ix(nextPutIndex())] = x;
return this;
}
final int nextPutIndex() {
if (position >= limit)
throw new BufferOverflowException();
return position++;
}
可以看到,写操作也是直接向position位置写数据,这里其实会挺迷惑的.如果说写和读都需要让position加1,那么每次读的时候,肯定是读不到写的数据啊.当然了,jdk肯定考虑到了这个. 当我们写完数据需要在读取之前的数据的时候,我们就需要再次将position置位0,然后在开始读取我们的数据.Buffer中提供了修改positon的方法.1
2
3
4
5
6
7public final Buffer position(int newPosition) {
if ((newPosition > limit) || (newPosition < 0))
throw new IllegalArgumentException();
position = newPosition;
if (mark > position) mark = -1;
return this;
}
当然了,如果我们想要正常读取数据的话只修改position是不够的,还应该再次修改limit的值,让它指向刚才写入的最后一个位置,我们才能保证读到的数据都是有效的.这就有了limit这个方法:1
2
3
4
5
6
7
8public final Buffer limit(int newLimit) {
if ((newLimit > capacity) || (newLimit < 0))
throw new IllegalArgumentException();
limit = newLimit;
if (position > limit) position = limit;
if (mark > limit) mark = -1;
return this;
}
但是每次调用这两个方法都很麻烦啊,这里jdk也帮我们想到了,所以有了flip()方法.很多人都知道写入Buffer数据之后要使用flip()方法然后才能读取到数据,但是不知道为什么,看了下面代码应该就知道了.1
2
3
4
5
6public final Buffer flip() {
limit = position;
position = 0;
mark = -1;
return this;
}
这里看一个实例来了解一下吧:1
2
3
4
5
6
7
8
9
10
11
12public static void main(String[] args) {
ByteBuffer buffer = ByteBuffer.allocate(1024); // 申请一个1024个字节的Buffer
buffer.put("1234567".getBytes());
// 调用flip()函数将position置0,将limit置位当初写到的最后一个位置
buffer.flip();
// 如果还有读取的数据就读取
while (buffer.hasRemaining()){
System.out.println((char)buffer.get());// 这里会按序输出1234567
}
buffer.limit(1024); // 这里在设置limit为1024,因为如果不设置就会写不进去了.然后接下来才可以继续写.
System.out.println(buffer.position()); // 这里输出position为7,也就是下一个要读或写的位置.
}
reset()方法
reset()方法主要是为了让我们能够在此回到上一个感兴趣的位置,比如在读取数据的时候发现出错了,我们就要重新读取,从上次对的地方开始读取.这就需要用到reset()方法.
当然了,reset()是要用到mark标记字段的.1
2
3
4
5
6
7
8
9
10
11
12
13// 先用mark()方法标记当前位置
public final Buffer mark() {
mark = position;
return this;
}
// 之后如果需要回到当前位置,就调用reset()将position置位mark的位置,开始读写
public final Buffer reset() {
int m = mark;
if (m < 0)
throw new InvalidMarkException();
position = m;
return this;
}
总结
Buffer是NIO中的一个很重要的辅助类,虽然不难,但是很重要,有必要去了解一下它的实现与基本机制,最起码能够在写代码的时候不会因为各种读取不到数据,没有使用flip()方法等导致找很长时间bug.
参考自博文:http://www.tianxiaobo.com/2018/03/04/Java-NIO%E4%B9%8B%E7%BC%93%E5%86%B2%E5%8C%BA/
这位大佬写的很不错,浅显易懂.其他文章写的也都挺不错的.